
Post updated 01/06/2025
TaxRight software, formerly known as TFP, is the secret to making e-filing your tax forms a breeze. Simplify the process by following our step-by-step guide to e-filing your forms using TaxRight software.
If you’re searching for a more general overview on e-filing, learn more about e-filing.
When you open your TaxRight software, you should see a prompt box offering to walk you through the process.
Let’s get started.
Table of Contents
- Adding Payers
- Editing Payers
- Creating Recipients as Individuals
- Creating a Recipient as a Company
- Editing Recipients
- Importing Recipient Data Using an Excel Template
- Importing Recipient Data Using the Previous Years’ Data
- Creating a Form
- Editing a Form
- Deleting a Form
- Creating Multiple Forms
- Creating Transmittal Forms: W-3 or 1096
- Printing Your Forms
- Testing Print Alignment
- Reprinting Your Forms
- Checking Your Printer Settings
Adding Payers
The payer is the company that paid the wages, contractor dollars, or other payment to the employees, contractors, or other recipient.
First, you’ll be prompted to create a payer (company). To do this, click Payers & Recipients on the top-bar menu, and then select Manage Payers & Recipients from the dropdown menu.

This will open a new prompt box. To create a payer, click the Add New Payer button and enter the correct information into the relevant fields. All of the bolded fields are required fields. When you’ve finished adding the information, click Save & Add Another to create additional payers. If you have no further payers to add, click Save, which will return you to the Manage Payers & Recipients screen.
Entering the State ID
To enter the state ID, you must have already added a Payer. Then, follow these steps:
- Select the relevant payer
- Click the View/Edit button in the upper right corner. This will open a new box of information.
- Click on the box labeled State ID
- Enter the relevant state and state ID
- Save, update and close the State ID prompt box, and then Save the Save Payer Company
Determining Payer Type
- 941 refers to the employer’s quarterly federal tax return
- 944 refers to the employer’s annual federal tax return
- 943 refers to the employer’s annual tax return for agricultural employees. You must file form W2 for agricultural employees.
- Military refers to military employers. You must file form W2 for members of the U.S. military and uniformed services.
- CT-1 refers to railroad employers. You must file form W2 for employees covered under the Railroad Retirement Tax Act (RRTA).
- Household employer refers to household employers. You must file form W2 for household employees. Do not include the household employees’ taxes on forms 941 or 943.
- Medicare government employer refers to U.S., state, or local agencies who file form W2 for employees subject only to the 1.45% Medicare tax.
Editing Payers
To edit a payer (or payers), return to the top-bar menu and select Payers & Recipients. From there, click on Manage Payers & Recipients.

This will bring up your list of payers in the prompt box. Select the payer/company you need to edit from the Payer/Company dropdown menu until it’s highlighted blue. Then, in the upper right corner, click the View/Edit button.

This will bring up the box with the payer’s information. Edit as needed. When you are finished, click the Save button.

If you’d like to edit a payer or company directly in the tax form, follow these steps.
Select Tax Forms from the top-bar menu bar and select the relevant tax form from the dropdown menu.

Click the Payer/Company from the dropdown and select the correct payer/company. Then, find and select the recipient you need to edit from the recipient list in the bottom left window.

Finding the Recipient
Sort your recipient/payee list in one of five ways: social security number (SSN), first name, last name, name 2, or ID number. Click Sort by dropdown list to organize the list as desired and find the recipient in question.
Creating Recipients as Individuals
The recipient is the individual who received the money. Recipients are usually employees or contractors.
Creating a recipient is similar to creating a payer. First, click Payers & Recipients on the top-bar menu, and select Manage Payers & Recipients from the dropdown menu.

Then, select the relevant payer/company from the Payer/Company window. This will highlight the payer blue and allow you to proceed. You must select the Payer/Company in order to be able to add recipients. Click the Add Recipients Manually button. This will open a new box for entering recipient information.

Enter all recipient information. Remember, bold fields are required fields. If you have multiple recipients to add, click Save & Add Another.

To Note: Don’t be alarmed if you don’t see the recipients’ information populate the box after clicking Save & Add Another; it will populate once you are finished adding and you click the Save button.
If you have only one recipient to add, or you’ve added all of your recipients, click Save to return to the Manage Payers & Recipients screen.
If you’d like to create a recipient/payee directly in the tax forms, follow these steps.
Select Tax Forms from the top-bar menu bar and select the relevant tax form from the dropdown menu.

This will open a Payer and Recipient Selection box. Click the Payer/Company dropdown arrow and select the correct payer/company.
Now, at the bottom of the box, click the New button. Enter the tax data into the tax form. When you’re finished, click the Save button.
If you have several new recipients/payees to enter, repeat this process until you’ve added them all.
Creating a Recipient as a Company
The recipient as a company is a company who has received the money.
Creating a recipient as a company is similar to creating a recipient as an individual. First, click Payers & Recipients on the top-bar menu, and select Manage Payers & Recipients from the dropdown menu.

Then, select the relevant payer/company from the Payer/Company window. This will highlight the payer blue and allow you to proceed. Click the Add Recipients Manually button. This will open a new box for entering recipient information.

When adding a recipient company, you can omit the name slot. Add the company name under Alternative Name.
Finish entering the recipient information (remember, bold fields are required fields) and click Save & Add Another if you have multiple recipient companies to add. If you have only one recipient company to add, or you’ve added all of your recipient companies, click Save to return to the Manage Payers & Recipients screen.

If you’d like to create a recipient/payee company directly in the tax forms, follow these steps.
Select Tax Forms from the top-bar menu bar and select the relevant tax form from the dropdown menu.

This will open a Payer and Recipient Selection box. Click the Payer/Company dropdown arrow and select the correct payer/company.
Now, at the bottom of the box, click the New button. Enter the tax data into the tax form. When you’re finished, click the Save button.

If you have several new recipients/payee companies to enter, repeat this process until you’ve added them all.
Editing Recipients
To make changes to your recipients, follow these simple steps.
First, click Payers & Recipients on the top-bar menu, and select Manage Payers & Recipients from the dropdown menu.

Select the payer/company that the recipient you need to edit is listed under from the Payer/Company menu. From here, select the recipient/payee you need to edit from the recipient menu and click the View/Edit button.

This will bring up the box with the recipient’s information. Edit as needed. When you are finished, click the Save button.

If you’d like to edit a recipient/payee directly in the tax forms, follow these steps.
Select Tax Forms from the top-bar menu bar and select the relevant tax form from the dropdown menu.
This will open a Payer and Recipient Selection box. At the top left of the box, click the Payer/Company dropdown arrow and select the correct payer/company. From here, select the recipient/payee you need to edit from the recipient list in the bottom window.
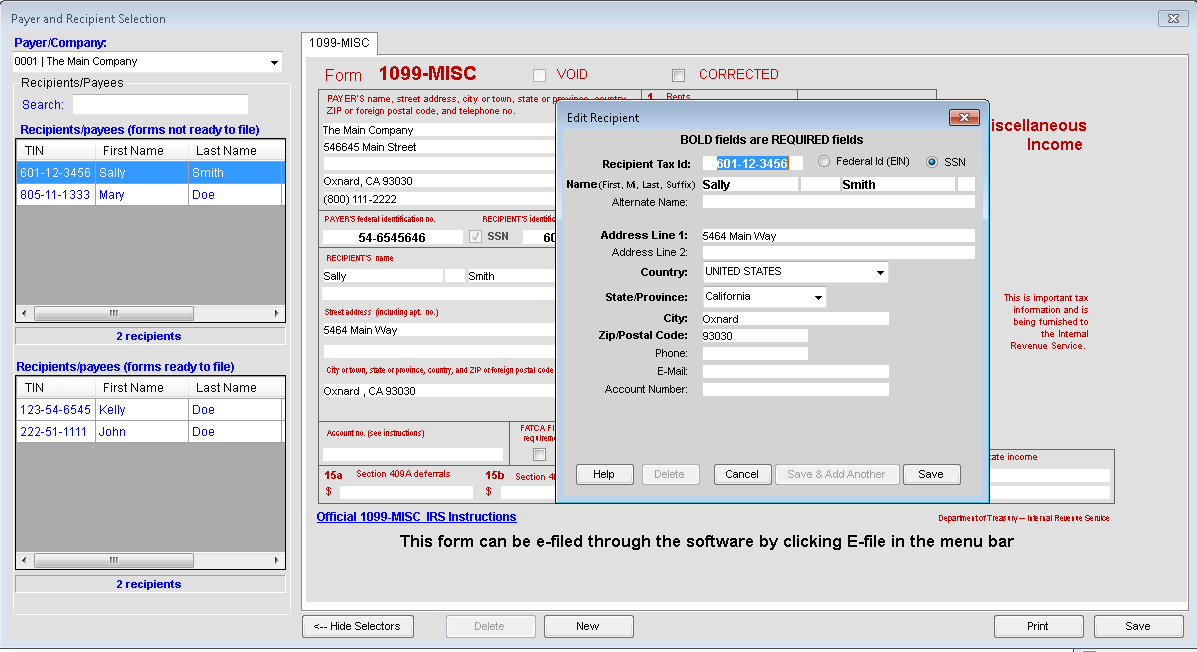
Sorting the Recipient
Sort your recipient/payee list in one of five ways: social security number (SSN), first name, last name, name 2, or ID number. Click the Sort by dropdown list to choose the manner you want to sort your recipients/payees in and choose whether you want to sort the top or bottom window.
To edit the information, click within the fields you’d like to edit and hit Enter on your keyboard. This will cause the Edit Recipient screen to open. Make the necessary changes within this box and click Save. The individual tax form will be updated, and your edits will be shown on the tax form.
Importing Recipient Data
You can import recipient data in bulk using two methods: using an Excel template and importing the previous years’ data.
NOTE: If you used another program other then TFP/TaxRight/LaserLink/ACA or other accounting softwre such as Quickbooks, you will need to export your data from other software program into a Microsoft Excel spreadsheet, then paste the data into our Excel template that you get from our software. This will be the Excel template you use to import.
Importing Recipient Data Using an Excel Template
First, click Payers & Recipients on the top-bar menu, and select Manage Payers & Recipients from the dropdown menu.
Click Add New Payer, or select an existing payer. Then, click on Import Recipients.
Click on Select Import Template, choose Recipient List from the drop-down menu, and press Get Template.
This will open a box prompting you to name and save your Excel template. Type in a unique file name for the template (e.g. FormName_Template) and save your file to an easy-to-locate destination, like your desktop. Click Save.

Temporarily minimize the TaxRight software screen. Don’t close it, just minimize it.
Find and open the Excel template you saved. Enter your tax form data into the appropriate fields according to the template (or paste existing data from another exported Excel spreadsheet, and format to our Excel template).
When you’ve entered all data, save and close the Excel file, and then pull your TaxRight software screen back up.
On the Import Recipients screen, enter the number of records (tax forms) you are importing in the appropriate box labeled # Of Records to Import. Then, click the button on the bottom labeled Import.
This will open a prompt box asking if you’d like to Add to existing data or Overwrite for the tax forms you’re importing.
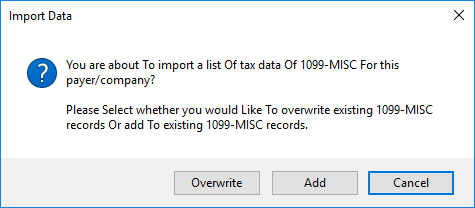
To Note: Add means you want to add more tax forms to the existing forms created for the selected payer. Overwrite means the current tax forms created for the payer selected will be overwritten with the new tax forms in the import, meaning all current tax forms in your software for that specific payer will be deleted.
Locate the template you used to input your tax form data earlier and click Open.
Your software will import the data from the Excel file. When completed, a message on the import screen will appear stating, ex. “Recipient List Imported" or "1099-MISC Imported.” This means it has all been imported successfully.
You can check to ensure all your tax data was imported successfully by checking the recipient list created under the payer/company selected.
To Note: If you experience Import Errors, click this link and scroll to the bottom of the page for more troubleshooting help.
Importing Recipient Data Using the Previous Years’ Data
First, click Utilities on the top-bar menu, and select Import Prior Tax Year Data from the dropdown menu.

A screen will pop up showing the remaining payers available to import. Select either the All Payers or Singe Payer option. If you select the Single Payer option, you must highlight (select) the payer you want to import. Click the Import button.

To Note: If you selected All Payers to import, once importing is finished, the import screen will close automatically. A pop-up message will appear reading “All previous year data has been imported successfully.”
If you selected Single Payer to import, once the payer you selected has been imported, the import screen will close automatically. A pop-up message will appear confirming the import.
Creating a Form
The TaxRight software comes preloaded with 12 different types of tax forms.
To create a form, select Tax Forms from the top-most menu bar and choose the specific tax form from the dropdown menu.
Then, choose the payer/company from the Payer/Company dropdown. This will pull up the Recipients Without Filed Forms window; select the relevant recipient. Enter the tax information into the data fields on the form. When you’re finished, click Save. you will now see Recipient in the Recipients/payees (forms ready to file) box.
Repeat steps for each recipient/payee and this will move all of them into the "forms ready to file" box.
Editing a Form
To edit a form, select Tax Forms from the top-most menu bar and choose the specific tax form from the dropdown menu.
Then, choose the payer/company from the Payer/Company dropdown. This will open a new window; select the recipient/payee from the bottom window to edit the relevant recipient’s tax form. Make the necessary changes to the data. When you’re finished, click Save.

Deleting a Form
To delete a form, select Tax Forms from the top-most menu bar and choose the specific tax form from the dropdown menu.
Then, choose the payer/company from the Payer/Company dropdown. This will open a new window; select the recipient/payee from the bottom window to delete their tax form.
Click the Delete button. A pop-up message will appear stating the tax form was deleted. Click OK.

To Note: When a tax form for a recipient/payee has been deleted, the personal information will still remain in the recipient/payee data file.
Creating Multiple Forms
If you need to create additional W2 or 1099s for a single employee/payee, follow these simple steps.
Select Tax Forms from the top-most menu bar and choose the specific tax form from the dropdown menu.
Then, choose the payer/company from the Payer/Company dropdown. This will open the Recipients/Payees (forms ready to file) window. Select the relevant recipient. Click New.

A pop-up message will appear asking if you want to create a new form for the same recipient. Click Yes.

Enter the relevant tax information into the data fields on the form.
When you’re finished, click Save.
Creating Transmittal Forms: W-3 or 1096
To create a transmittal form, click Tax Forms from the top-most menu bar. Then, select W3 or 1096 from the Transmittal Forms section at the bottom of the dropdown menu.
Select the relevant payer/company from the Payer/Company dropdown menu. Then, select the relevant Filing Method from the dropdown menu at the bottom, and for form 1096, click the corresponding form in section #6.
For W3 forms, select the corresponding State ID in section #15. If the State ID is not available, you will need to create & save a State ID for the Payer.
To Note: Select Paper for a total of all forms you are paper filing for the specific payer selected.
Select E-File for a total of all forms you are e-filing for the specific payer selected. Remember, you do not need to e-file a 1096 or W-3 form, since these forms are automatically included in the data transmittal.
Select All for a total of all filings, both e-file and paper, for the payer selected. This option should only be used for payer records if both paper and e-filing has occurred for the same payer.
Printing Your Forms
To print your forms, follow these simple steps.
First, select Print Forms from the top-most menu bar. Then select Print Tax Forms from the dropdown menu.

Select the appropriate payer/company from the Payer/Company dropdown menu in the top left. Then, select the correct tax form type from the Tax Form dropdown menu.
Select the relevant recipient(s) from the Recipients Without Forms Printed window.
Choose the correct format, printing option (pre-printer or laser generated), and number of copies you want to print.
Alignment can be adjusted. Make sure to test your print alignment at least once before printing several forms. Select "How-to Test Print Alignment" to run a test (see blue box below for more information).

To Note: If you’re only printing one recipient at a time, this will only print the top form. When you select Print on the second form, it will void the top form. If you have more than one recipient, you should always select 2 or more depending on the form type.

How to Test Print Alignment
We highly recommend you test your alignment on a blank piece of printer paper before printing directly onto forms to save yourself from potentially wasting forms.
Before printing, a box will pop up walking you through testing your print alignment.
- Verify the printer is loaded with blank printer paper (not blank tax forms) before proceeding with the alignment test.
- Adjust the alignment settings accordingly. Make sure to click Save Alignment each time you test a setting.
- Print your test form onto the blank paper. Check alignment by holding it up to a light with a blank tax form behind it. If the text doesn’t align within the form’s boxes, adjust the alignment and try again.
Set the print alignment to the correct alignment and click Save Alignment.
Click View to preview the form on the screen or Print to print. If printing from the View screen, this prints as a PDF and will not save the alignment. Instead, you must print from the print button if you aligned.
Reprinting Your Forms
Reprinting your forms is easy.
First, select Print Forms from the top-most menu bar. Then select Print Tax Forms from the dropdown menu.

Select the appropriate payer/company from the Payer/Company dropdown menu in the top left. Then, select the correct tax form type from the Tax Form dropdown menu.
Select the relevant recipient(s) from the Recipients with Forms Printed window.
Choose the correct format, printing option (pre-printer or laser generated), and number of copies you want to print.
Set the print alignment to the correct alignment and click Save Alignment.
Click View to preview the form on the screen or Print to print. If printing from the View screen, this prints as a PDF and will not save the alignment. Instead, you must print from the print button if you are aligned.
Printing the 1099 Correction Form
On the tax form screen, click Print.
Select the tax form you just filed from the Tax Form dropdown menu. Check the Correction box at the top of the window. Then, select the correct recipient from the Recipient/Payees window.
Choose your printing option (either pre-printed or laser generated).
To Note: Copy A can only be pre-printed, not laser generated.
Select the copy you’d like to print, then set the print alignment to the correct alignment and click Save Alignment.
Click View to preview the form on the screen or Print to print. If printing from the View screen, this prints as a PDF and will not save the alignment. Instead, you must print from the print button if you aligned.

To Note: If you only want to print the correction forms you filed, select 1096 form and check the Correction box in the Tax Forms section. Then, highlight the payees with correction forms filed and click either View or Print.
Check Your Printer Settings
These instructions on checking your printing settings are taken directly from ComplyRight. It is highly recommended to test print using a blank sheet of paper when testing any printing issues.
"NOTE: The IRS/SSA recommends using a high quality type printer no more than 4 – 5 years old"
If you are having issues aligning your forms, it may be that your printer or print driver is out of date, or you have the incorrect type of printer.
-
Bubble jet and Ink jet are not supported due to the margins and font these types of printers use a spray on ink that smears.
-
Printers - PCL6 compatible might have problems with the drivers these printers are out to date for Window 7 and up.
-
All Laser printers make sure your print drivers are up to date – check with your printer manufactures web site. (We Recommend to Re-Boot PC after installing/updating printer drivers)
-
Please note Generic drivers may still have issues. Verify with Manufacturer Product Support your printer is using correct print drivers.
-
Printer Scale is set at 100% - locate this setting under your Windows Printer and Devices screen
-
Second Form alignment is not adjusting this could be your current printer driver not supporting this feature
-
Printing too light - check under Printer Preference, Paper/Quality it may be set to EconoMode (Toner Save) also another possible cause is that if user have color printer then in order to print tax forms correctly, color printer should be set with Grayscale Printing (Black and White). Also check Print Density Printer Settings & increase. Clean inside Printer, replenish toner levels, inspect/clean imaging drum, remove protective film. Always Refer to Manufacturer Manual and/or Website.
-
Form Alignment - Will align the information such as dollar amounts, address, etc., on entire form type (sheet) not each individual section of the tax form. (Software not compatible with Free IRS Forms)
-
When Printing through software you will be able make any needed changes in your Printer Properties, such as double sided, Layout, Margins, Etc., You may also be able to make these changes through your Printer Software or Windows Control Panel > Devices and Printers.
NOTE: In Software when you adjust the alignment settings, you will have to use the PRINT button in the software. This will print based on any new alignment setting. Do NOT print forms from the print preview screen by using the VIEW button, as this will not print based on any new alignment setting.
Finding Recipients/Payees in the Tax Forms or Printing Screens
You can find recipients in both the Tax Form and Tax Form Printing screens.
To search for a recipient/payee in the Tax Form screen, select your payer/company from the Payer/Company dropdown menu. In the Search for Recipient field, enter either partial of the TIN, the last name, or the first name of the recipient for whom you are searching.

Then, choose Top Window or Bottom Window to select which recipient list you want to search.
Click Search. The matching search result will be highlighted.
To Note: If multiple records are found, manually click to the next record until you’ve reviewed all records matching your search and found the appropriate one.
To search for a recipient/payee in the Tax Form Printing screen, select your payer/company from the Payer/Company dropdown menu. Then, select the tax form for which you need to print from the Tax Form dropdown menu.

In the Search for Recipient field, enter either partial of the TIN, the last name, or the first name of the recipient for whom you are searching. Then, choose Top Window or Bottom Window to select which recipient list you want to search.
Click Search. The matching search result will be highlighted.
If you have any further questions about using your TaxRight software, you can reach out to ComplyRight for help – they have live support chat available here and have helpful tips available online at https://support.custsupp.com/hc/en-us.
This article is designed to provide accurate and authoritative information. However, it is not a substitute for legal advice and does not provide legal opinions on any specific facts or services. The information is provided with the understanding that any person or entity involved in creating, producing or distributing this article is not liable for any damages arising out of the use or inability to use this product. You are urged to consult an attorney concerning your particular situation and any specific questions or concerns you may have.


3 comments
Kathryn S. Hoff
I want to efile but I don’t see me forms in the efile site even though i selected efile in the tax right software – a note pops up to review the forms but no forms are there to review
Lauren
Hello Benton, thank you for your question! You can file for multiple payers under one account.
Benton Nunn
I have 2 payers. If I want to efile, do I need to create 2 separate efile accounts?