Installation Guide: Aluminum Frame Whiteboards and Combination Boards
| Instructions for Part #'s: | Materials Needed: |
|---|---|
|
BSS-92588-748 – 24" x 36" Aluminum Frame Whiteboard |
2 drywall anchors (included) |


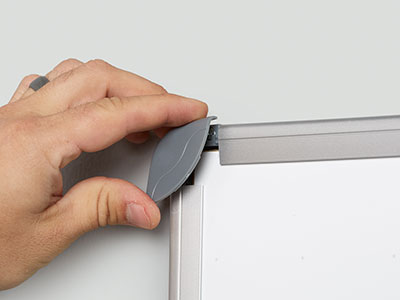
Step 1
Remove plastic corner caps and set aside.

Step 2
Using a level to determine good placement, mark drilling holes onto the wall through the top hole of each corner with a pencil.
(Note: There are 2 holes in each corner to make it easy to hang your board either horizontally or vertically. However, it is not necessary to use both holes during installation – only the top hole.)

Step 3
Set board aside. Pre-drill holes for the plastic wall anchors at pencil marks using a 3/16" drill bit.

Step 4
Install the plastic wall anchors by hammering them into the pre-drilled holes until they are flush with the wall.

Step 5
Reposition the board so that the top corner holes are positioned over the plastic wall anchors. Insert screws through the holes and screw each in place into its corresponding wall anchor.
Step 6
Snap the plastic covers back onto the corners. Attach the marker tray onto the bottom edge of the whiteboard, using a rubber mallet or hammer to gently tap it into place from underneath.