
Printing your own checks saves you time, money, and depending on the design, they can look incredibly professional when donned with your company logo and business details. This article is a comprehensive guide for how to print checks in QuickBooks online. We’ll cover everything you need to know, including the various elements of a check, how to print checks, and the best printer for printing checks from QuickBooks.

Need blank check stock? We've got the goods.
Printing Checks 101
What Are Checks Used For?
Since handing people large stacks of cash is somewhat impractical—and generally reserved for mafia movies—a check allows the person being paid to carry a single piece of paper instead of a large sack with a dollar sign.
A check (sometimes spelled cheque) is a document that orders a bank to pay a specific amount of money from a person or company’s bank account to the person or company in whose name the check has been issued. A check must contain a few important details, such as the date, the monetary amount, the name of the person being paid, and the signature of the person issuing the check, known as the drawer. All of these details are requested on the check itself and accompanied by a designated space to fill out.
Can I Print A Check Online?
Yes. You can print checks from your computer using check printing software. You will also need check stock—the paper required for printing checks.
What is Blank Check Printing Software?
Printing software allows you to print checks directly from your computer rather than write them out by hand. Among many other features, QuickBooks has check printing software.
What Is Check Stock?
Check stock is special paper used to print checks with security features that prevent checks from being copied, altered, or otherwise tampered with. Before printing a check online, you will need to replace regular printer paper with your chosen check stock.
What Is Blank Check Stock?
Blank check stock paper is a type of check stock. You may sometimes see the terms check stock and blank check stock used interchangeably, but if you’re really digging into the details, there’s a key difference.
Blank check stock does not contain bank account information, which makes it more secure and versatile. You don’t need to worry about anyone stealing your checks since your account information isn’t printed on them yet. You can also use the same stock for all of your bank accounts if you have multiple businesses as you can print the correct account information on the check when you’re ready to print it.
The downside to using blank check paper is that you need to use magnetic ink when you print the bank line (MICR code) of the check.
What Is Magnetic Ink?
Magnetic ink is used primarily by the banking industry to make the processing of checks fast, accurate, and secure. The ink is used in conjunction with Magnetic Ink Character Recognition (MICR) technology. Before the advent of magnetic ink in the 1950s, all checks had to be processed manually by individuals. Due to a surge in the use of checks, this process became too time-consuming, so it became automated.
The bank line—the misshapen numbers and characters that run along the bottom of the check—includes the bank code, bank account number, check number, and document-type indicator. These numbers help protect against fraud, and they can be read by both machines and humans.
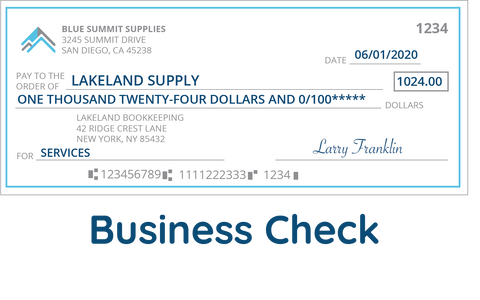
Elements of a Check

- Name and address (personal or business). This is often pre-printed on the check.
- Check number for tracking purposes.
- Date check is written.
- Name of the person or business being paid. Who is authorized to cash the check?
- Check amount written in numbers.
- Check amount written in words.
- Bank information, including the name and (occasionally) a logo.
- Bank number to identify the bank you use.
- Account number of your business or personal account (where the money will come from).
- Memo or check purpose to remind yourself and the person receiving the check what it was for. This section does not need to be filled out if you don’t need it.
- Signature that authorizes payment.
Check Styles
QuickBooks can print Voucher, Standard, or Wallet check types .
- Voucher: A voucher check is 8 1/2" x 11". The check itself makes up one third and comes with two vouchers below that are perforated.
- Standard: The usual handwritten check you might use for a personal checking account.
- Wallet: Printable wallet-style checks come with detachable stubs to help with record keeping.

How To Print Checks In QuickBooks Online
Follow our step-by-step instructions for how to print checks in QuickBooks.
- Sign in to QuickBooks
- Select Banking Menu
- Select Write Checks
- Fill in the required fields:

1. Bank Account: Choose the bank account the money will be taken from.
2. Ending Balance: The balance of the bank account that will be used as of that day.
3. Pay to the Order of: Specify the name of the payee the check is being issued for. If you’ve paid them before, their information should autofill.
4. No. : The number of the check, assigned depending on the preference you set in QuickBooks.
5. Date: The date you’re issuing the check.
6. Amount: Enter the amount in numbers, and the amount will be automatically spelled out with words below the Pay to the Order field.
7. Address: The address of the payee, which will fill in automatically.
8. Memo: This is an optional field that you can leave blank. Think of it as an optional note you can leave yourself about the reason for the payment.
9. Print Later or Pay Online: If you’d like to print the check at a later date, check off Print Later. If you want to pay online, check off that box.
10. Expenses or Items Tab: Use the Expense tab to enter any shipping charges or other expenses not associated with any items in QuickBooks. Use the Items tab to choose the applicable item from the drop-down menu.
11. Save & Close: Click this button, and congratulations, you have created a check!
- In the Write Checks window, select the Print icon, where you will be given two options.
- Select Check to print a single check. You will be asked to enter a Printed Check Number.
- Select Batch to print multiple checks. You will be redirected to the Select Checks to Print window where you can select the checks you would like to print.
- In the Print Checks window, choose your printing settings.
- Select your printer name and type.
- Choose your check style (Voucher, Standard, or Wallet.)
- If your pre-printed checks already bear your company name and address, simply uncheck Print company name and address.
- Review your choices.
- Ensure your check stock paper is properly oriented in your printer so that the information is correctly aligned on the check.
- Click Print.

How To Print Multiple Checks In QuickBooks
QuickBooks makes it easy to print as many as you like at one time.
- Go to the Write Checks window.
- Select the Print icon.
- Select Batch. This will bring you to the list of checks you chose to Print Later. Choosing this will redirect you to the Select Checks to Print window. Check off which ones you want to print and select OK.

How To Print Check Stubs In QuickBooks
QuickBooks Voucher checks are ideal for accounts payable and payroll. They come with two vouchers/pay stubs, each with a perforated edge. Keep one for your records and give the payee the other for their records.
QuickBooks Wallet checks also come with one detachable pay stub to aid in your business’s record keeping.

How To Print Check Register In QuickBooks
- Click Accounting on the left menu bar.
- Go to the Chart of Accounts.
- Choose your bank name
- Click View Register.
- Select the funnel icon drop-down arrow.
- Choose the date range for the specific period you want to print.
- Click Apply.
- Select the print list icon, and you’ll be able to print your check register.
Consult QuickBooks support if you have further questions about how to use their check printing software.
Best Printer For Printing Checks
What Kind Of Printer Do I Need To Print Checks?
Generally speaking, you don’t need a special kind of printer to print your own checks. Most printers will do the job just so long as they are compatible with the magnetic ink used to print the MICR code. A laser printer is much more compatible with magnetic ink than an inkjet printer. It’s possible to use magnetic ink in an inkjet printer, but it can compromise the quality of the magnetic print. There are also some check printers that come with special features for printing checks, like watermarks, but something simple should work just fine.

Magnetic Ink Printer For Checks
A laser printer with MICR toner is the best option when it comes to printing your own checks. MICR toner is available at your local printing supplies store, or it can be ordered online from toner shops or Amazon.

Best Printer For Quickbooks Checks
Look for a printer that takes MICR toner cartridges. The HP LaserJet Pro M15w Wireless Laser Printer bundle on Amazon comes with a MICR Toner Cartridge for check printing preinstalled, so you only need to make one purchase to get started. You can also call or visit your local printing supplies store to support businesses in your community. Let them know that you intend to print checks with your printer, and they will give you advice on the best brand to suit your needs.
Types of Check Stock
Business Check Stock
Business check stock is used for printing business checks for any money you would like to pay out of your business account. The stock should have your company name and address and may have your bank information built-in. For added security, include your company logo and protections such as photocopying prevention, watermarks, security coatings, and holograms.

Personal Check Stock
Personal check stock is used for printing personal checks. It is meant for anything you would like paid out of your personal account. The stock should have your name and address and may have your personal bank information built-in. If you want a more secure check, choose stock options with features such as photocopying prevention, watermarks, security coatings, and holograms.

High Security Blank Check Stock
The more security details you have on your checks, the better protected you are from possible tampering or duplication. Check stock can come with a range of built-in security features such as:
- Foil holograms
- Intricate borders
- Multi-colored background
- Watermarks
- Heat sensitive icon to prevent photocopying
- Randomly placed fibers
- Fluorescent fibers only visible under UV light
- Security coating to block tampering
- Chemical sensitive paper
- Whitebox (chemical wash detection box)
- Security features warning label
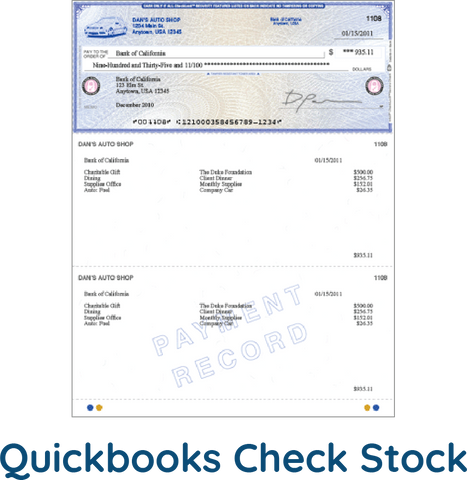
Blank Check Stock For QuickBooks
QuickBooks sells a selection of Check Stock that’s specifically designed for printing with QuickBooks software. They have a variety of checks for different purposes with varying features and security details.
More From Blue Summit Supplies
💡 Can You Handwrite a 1099 Form? And Other Tax Form Questions Answered
💡 Can I Print 1099 on Plain Paper? And Other Tax Form Questions
We’re big on office supplies and helping businesses find the best printing solutions. Follow our blog for the latest trends, strategies, product comparisons, and more.
If you have any questions or want to talk to someone at Blue Summit Supplies, send us an email or connect with us on Twitter, Facebook, or Instagram.
 For more informative articles about office supplies, subscribe to our email newsletter!
Never fear, you won't begin receiving daily sales emails that belong in a spam folder. Instead, we promise a fun weekly roundup of our latest blog posts and great finds from across the web. And if you lose interest, it's always easy to unsubscribe with a single click.

2 comments
Lauren
Hello Anessa, thank you for your question! We do not have a template available for Microsoft Word. This content was provided by a Quickbooks expert, and we suggest contacting Quickbooks’ support for further help: https://quickbooks.intuit.com/learn-support/. Thank you! – Lauren // E-Commerce Customer Service Representative // Blue Summit Supplies
Anessa
This article works for QuickBooks desktop, and not QuickBooks Online. Now I have 500 blank check stop and no way to print them. Do you have a template for Microsoft Word?