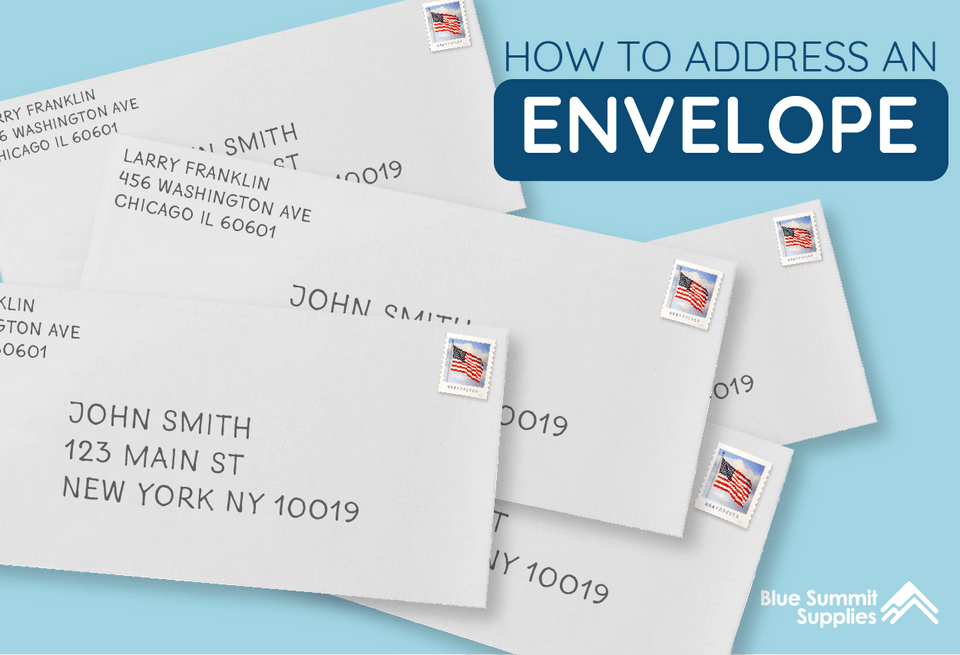
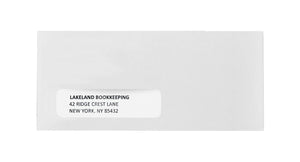
We all know the basics of what to write on an envelope, and you’ve probably addressed hundreds of envelopes. But unless you’ve read through the US Postal Service requirements meticulously, it’s very likely you’ve been missing some little-known facts about addressing envelopes. Unknown to many, the US Postal Service has very detailed requirements for how they want their mail addressed. To help you learnwhat to write on an envelopeand fulfill those requirements, we’ve listed the most commonly missed USPS requirements.
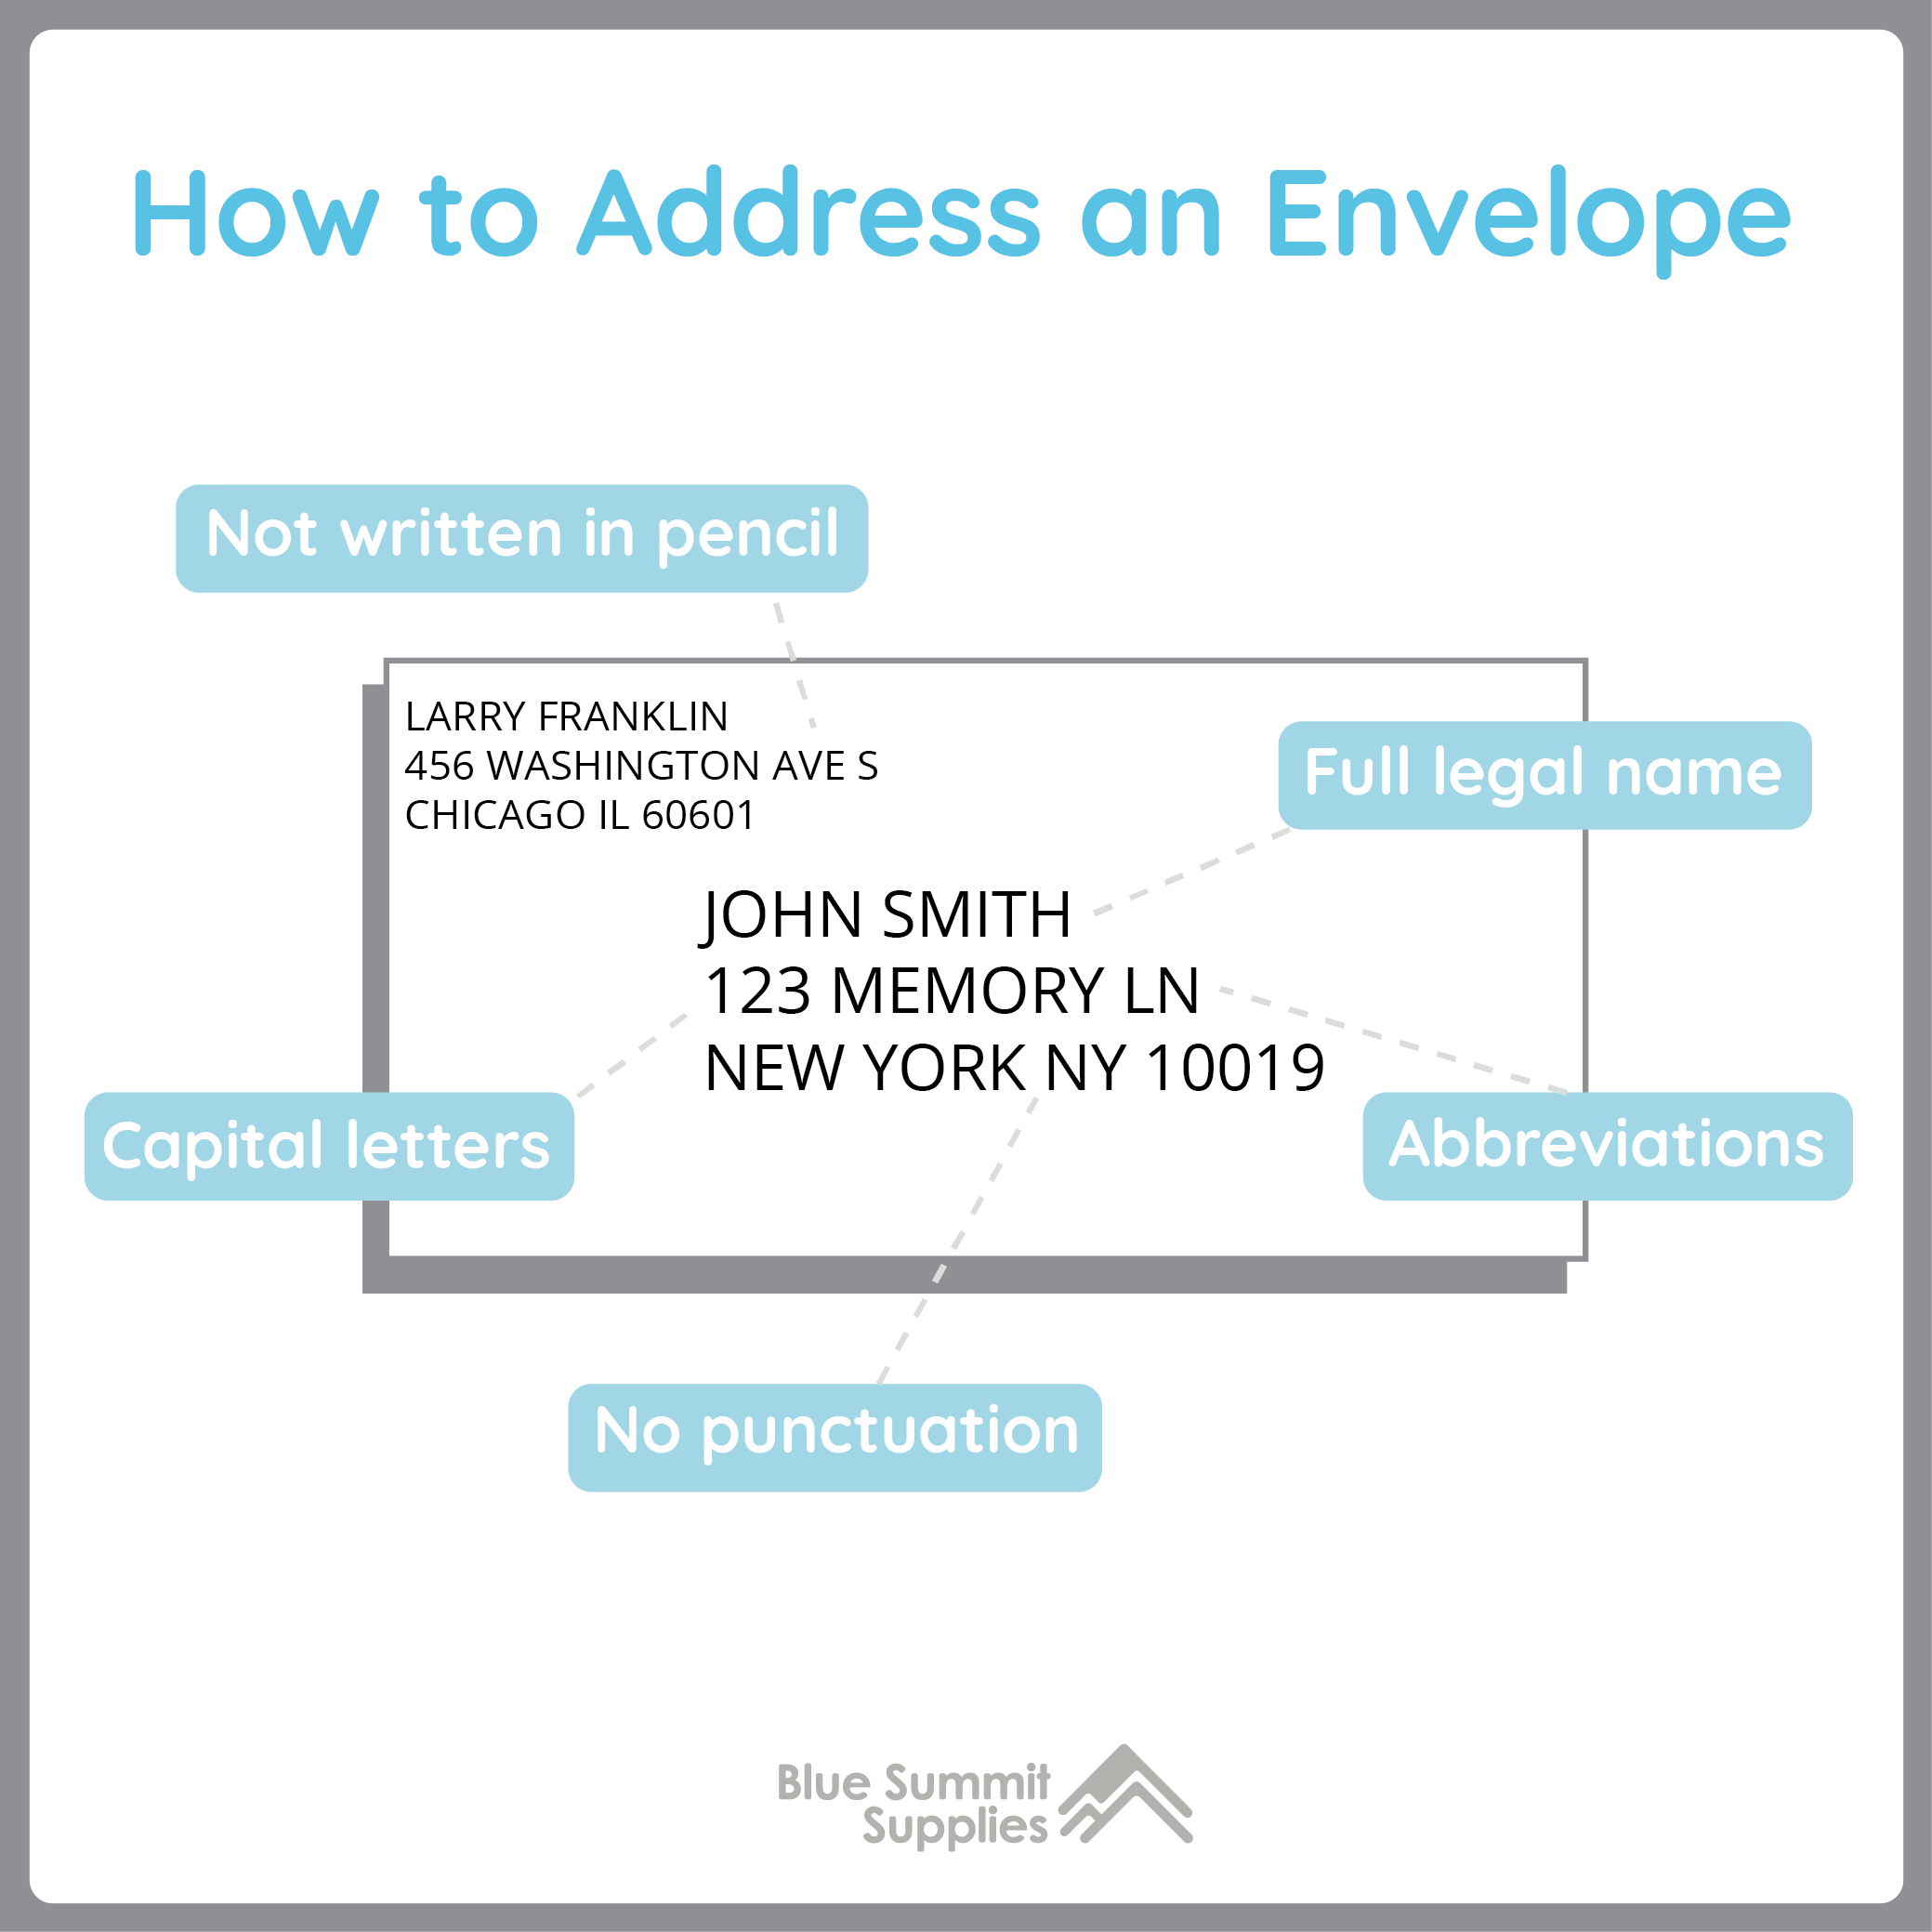
- Addresses cannot be written in pencil. An address should be in ink – either written in pen or typed.
- Everything should be in capital letters. Whatever is written on the face of the envelope should be written in all capitals. While most mail is sent and carried without capitalized letters, it’s preferred for every line of the address to be capitalized.
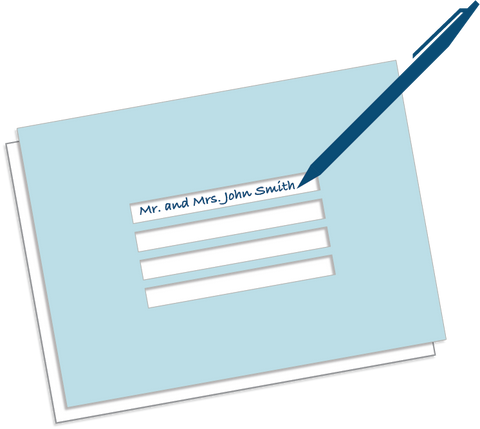
- There should be no punctuation. When you were taught what to write on an envelope,chances are you learned to write “Mr. and Mrs.” or “New York City, NY.” By USPS standards, this is incorrect. Regardless of numbers, titles, or abbreviations, there shouldn’t technicallybe any form of punctuation on your envelope.
- Only list the recipient’s full legal name. The USPS prefers no other form of name, whether it be a nickname or initials, listed on the face of the envelope.
- Abbreviations should be used for streets, apartments, states, etc. For the full list of abbreviations acceptable to the USPS, try the links below:
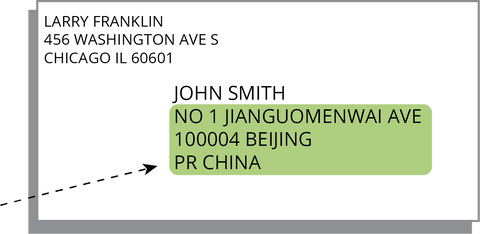
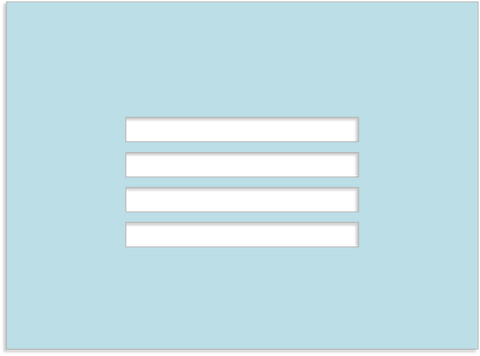
Here is an example letter address template to show you how to sign an envelope:
Don’t worry! Just because these are the technical requirements of the postal service doesn’t mean you can’t make your address more exciting. Your mail will still be processed and delivered even if it doesn’t match this formatting.
Where To Write Return Address?
How to write a return address on an envelopeis generally a question of placement. The format of a return address should be the same as the main address on the envelope. The traditional placement of the return address is in the top left corner of the envelope. However, it may also be placed on the back flap of the envelope. If you’re sending private mail, this is a great placement because it keeps the front of the envelope looking clean.
If you’re sending a formal or professional letter, it’s wise to stick with the traditional placement in the upper left corner. The recipient can quickly see where this letter is coming from and it keeps all contact information in one general area.

While these basic addressing formats are extremely important, there are even more occasions, titles, and countries that can make envelope addressing a little confusing. We’ve compiled a list of helpful guidelines for when you’re addressing in unique situations.
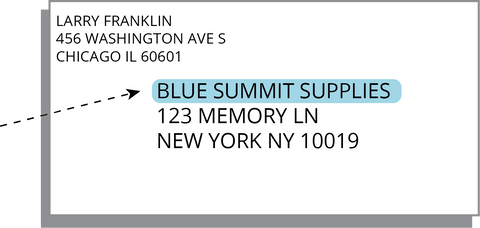
How To Write an Address To A Business
If you’re addressing an envelope to a business, write the company name on the first line where you would normally put the name of an individual. Since the letter is to a business, you can replace the individual’s name with the name of the business.
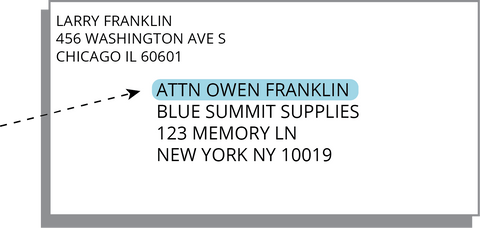
If you’re addressing an envelope to an individual ata business, you need to add an additional line. To avoid any confusion, begin the first line with ‘Attn’ (the abbreviation for ‘Attention’) followed by the individual’s name. Below this should be the business’ name, and the rest of the address should follow traditional guidelines below.
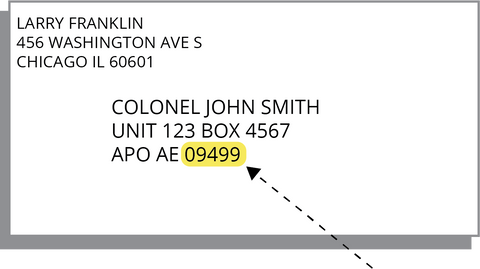
How To Write A Military Address
Addressing envelopes to people in the military can be a little complex. We’ve broken it down to clear up any confusion.
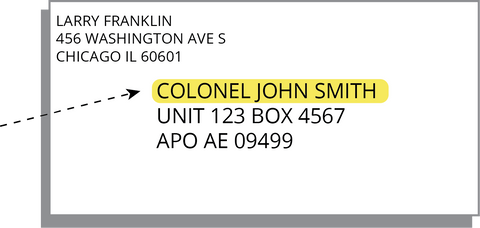
Once again, the recipient’s name should go on the first line and always be preceded by their rank. While abbreviations are acceptable, try to write out their whole rank if possible.
If the recipient is single, the first line should include their rank and name only:
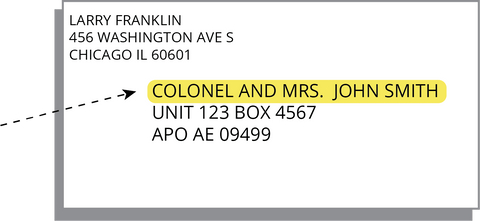
If the recipient is married, the husband’s rank and name should precede his wife’s. Even if both are in the service or if the wife outranks her husband, the name layout should still appear the same:
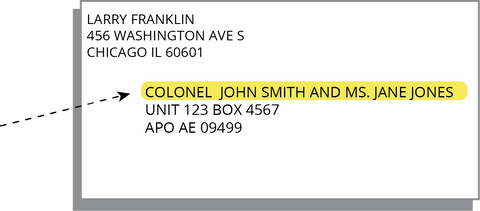
If a wife chooses to retain her maiden name, then her name should be listed separately from her husband’s along with her own appropriate title:
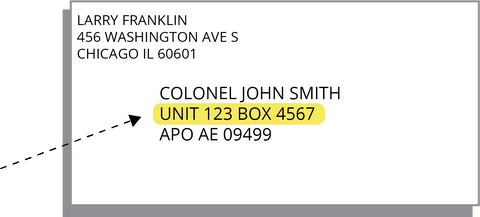
Once you have the recipient’s full name and rank on the first line, the next address lines should include their unit, box, and number.
The last line should indicate whether it’s Air/Army post office, Fleet post office, or Diplomatic post office. These indicate which base the letter should be mailed to.
- APO– Army Post Office, associated with Army or Air Force installations
- FPO– Fleet Post Office, associated with the Navy
- DPO– Diplomatic Post Office, association with U.S. diplomatic locations
- On the same line, indicate to which region this piece of mail is being sent.
- AE if it’s being send to Armed forces in Europe, Middle East, Africa, and Canada
- AP for Armed Forces in the pacific
- AA for Armed forces in American
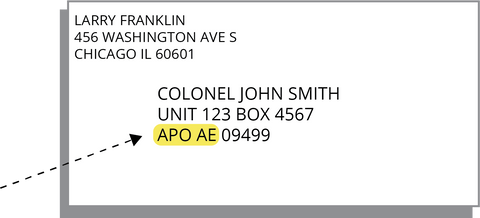
Lastly, complete the address with the appropriate zip code.
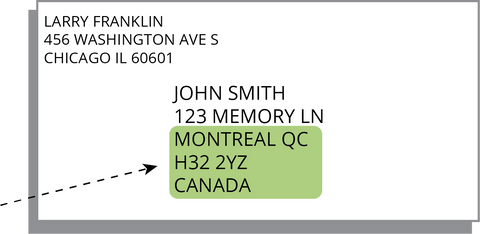
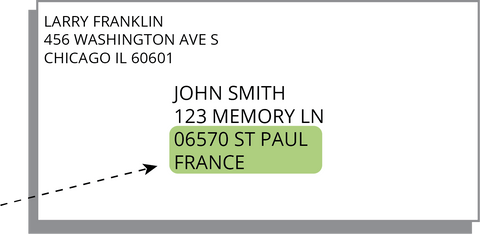
How To Address An Envelope For International Mailing
How to label an envelopefor international mail can be a bit tricky because names and numbers might look a little different. However, sending international mail doesn’t have to be a headache. All you need to do is add the country below the last line.
Although writing the country below the address will ensure your mail’s safe arrival, there are more detailed and specific instructions you can incorporate into your international mail.
Canada
When addressing a letter to Canada, the formatting will mostly look the same. The only difference is a double space between the province and the ending zip code.
France
Sending a letter to France should follow the same US postal standards. However, on the third line the postal code should come before the city and state.
China
There are a couple different options for writing an address when you are sending a letter to China. First, choose between addressing your envelope in Chinese characters or pinyin.
Pinyin romanization was created to teach the Chinese language to Westerners. Instead of using traditional Chinese characters, they used English letters. This makes addressing mail much easier for those of us who haven’t brushed up on our Chinese characters. The formatting will look similar to mail sent through the US postal service, but there are a few differences to note.
Be sure to specify whether this letter is going to Taiwan or the mainland China. If the letter is going to Taiwan, it should be listed as “ROC” with a three-digit code on the preceding line.
Mail to mainland China should be listed as “PRC” with a six-digit code. After these abbreviations, include “China” or “Taiwan” for extra care.
How To Address A Postcard
Addressing a postcard is fairly straight forward. Most postcards will have a middle line dividing the card into two different sections. The section on the left is for writing the message and the section on the right is for writing the address. Some postcards don’t have a dividing line so it’s just a blank side. In this case, keep the address on the right side.
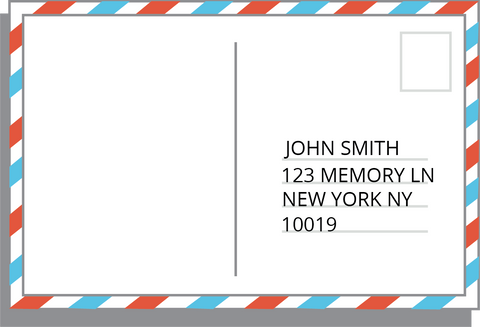
A return address is not required but if you choose to add one, place it in the top left corner. Since a postcard is usually sent from abroad, a return address is not necessary but it’s also perfectly acceptable. Just remember: writing a return address will cut into the space designated for writing your message.
Helpful Tip
To make your address stand out, try putting a border around your postcard. Maybe draw a box or add a decorative touch. This isn’t necessary and your letter will still be delivered without it. But this will help the postal service find the address easier, and it also adds a touch of personality to your mail.
For more details on how to address different collateral, check out our Ultimate Guide to Envelopes. This source compiles a variety of potential recipients and how to address them.
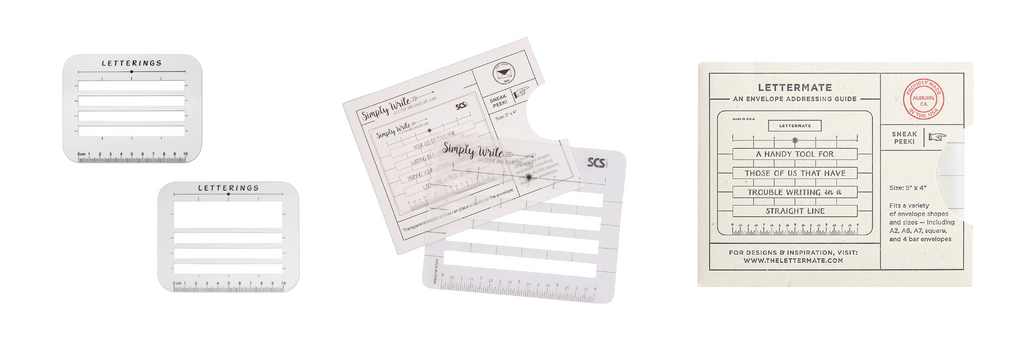
Envelope Addressing Stencil
When you’re addressing an envelope, it’s hard to keep your address centered and the lines straight. A letter addressing stencilis a great fix for this problem. Using an envelope stencil helps you address your envelopes neatly. Here are a few links to some great envelope addressing stencils:
- Envelope and Address Stencil Ruler Guide
- Lettering Envelope Addressing Stencil
- Lettermate Addressing Guide
How to Make a DIY Envelope Stencil
If you don’t want to buy an envelope addressing stencil, you can make your own.
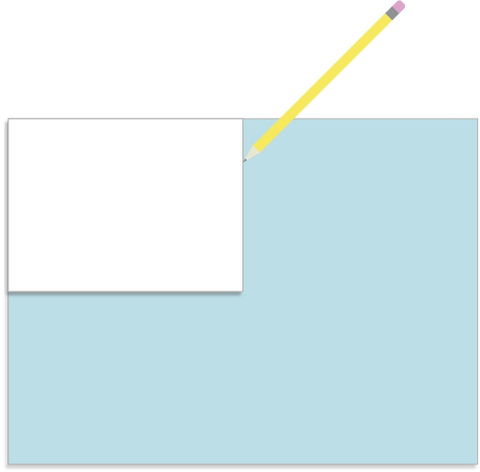
Step 1: Use a pencil to trace around your envelope onto a sheet of cardstock.
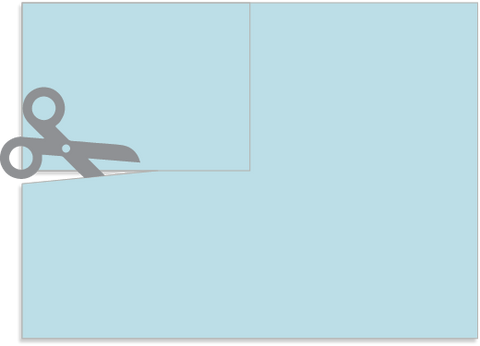
Step 2: Use scissors to cut out the traced envelope shape from cardstock.
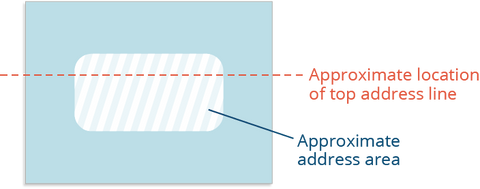
Step 3: Determine the approximate size and location of your address area. Depending on how much space you want the address to take up, determine approximately where you’d like the top line of the address to fall.
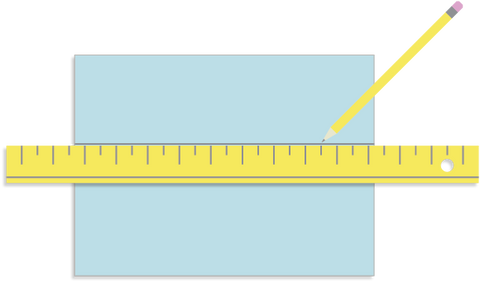
Step 4: Use a ruler and pencil to draw a line across the template where the first line of the address will go, as determined in step 3.
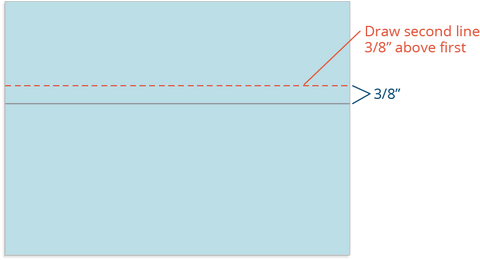
Step 5: Draw a second line across the template that measures 3/8” above the first line. This will create the space where you’ll write the top address line.
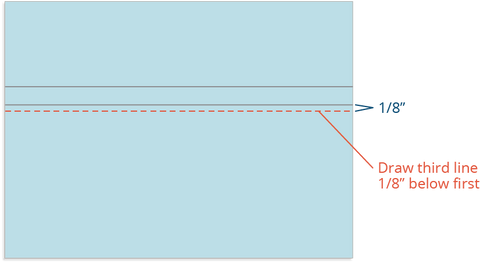
Step 6: Next, draw a third line across the template that measures 1/8” below the first line. This will create the space between the first address line and the second address line.
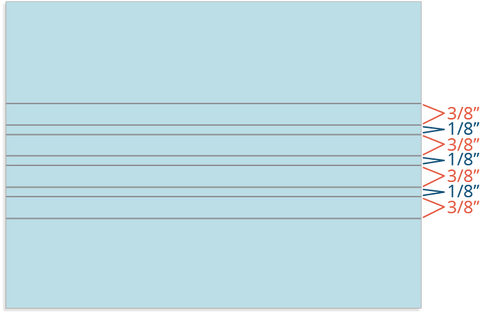
Step 7: Continue drawing lines across the template to create 3/8” spaces for each address line, alternating distances of 3/8” and 1/8” apart to create a 1/8” space between each address line. (The sample shown includes space for 4 address lines, so there are four 3/8” spaces, plus three 1/8” spaces between each.)
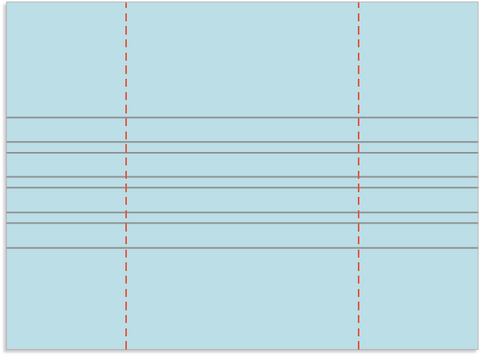
Step 8: Taking into account the approximate address area you determined in step 3, draw vertical lines across the template to cordon off the left and right edges of your address spaces. Make sure you have left enough horizontal space for writing longer names and addresses.
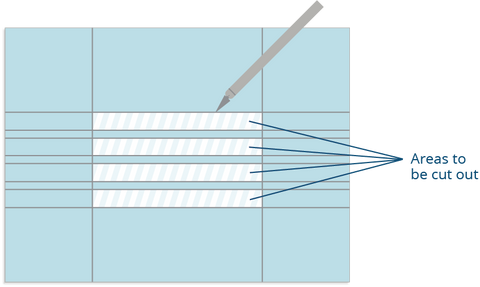
Step 9: Using a metal ruler and an X-ACTO knife, cut away the rectangular 3/8” spaces from the center of the template.
Step 10: Your template is now complete! If desired, erase any remaining pencil lines for a neat and tidy template you can use over and over again.
Step 11: To use your new DIY envelope addressing template, align the template on top of an envelope that is the same size as your template, and inscribe your address in the blank spaces.
Address Labels
Envelope addressing stencils are great but sometimes you may send out more mail than you’re comfortable hand addressing. Thankfully, you have address labeling options.
Using Word and Excel, you can create your own address labels.
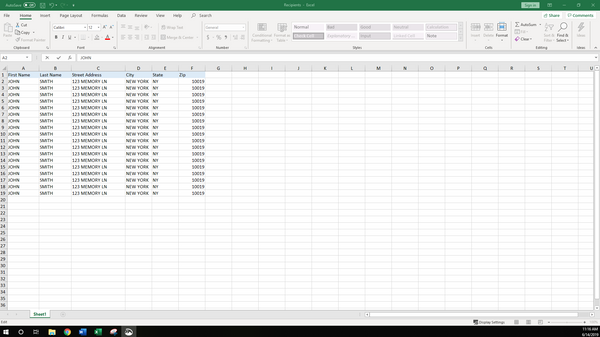
Step 1: In an Excel spreadsheet, list the names and addresses of your recipients. Be sure to divide each piece of information by category, e.g. first name, last name, street address, city, etc. Don’t forget to label each column as well.
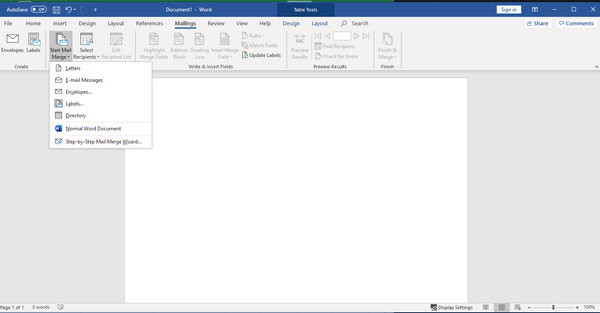
Step 2: Next, open a new Word document. In this document, select the “Mailings” heading. Under this tab, click the option that says,“Start Mail Merge” and then click “Labels.”
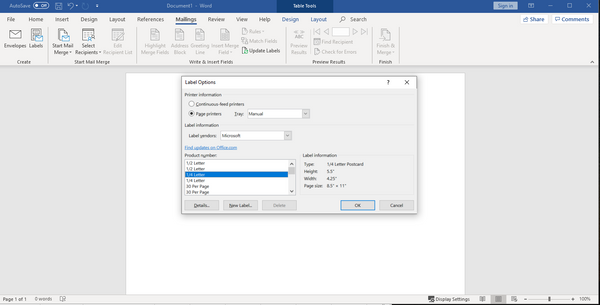
Step 3: The drop-down menu should be on “Manual.” If it isn’t, make sure you change it. Select the product number that fits your needs and then hit “Ok.”
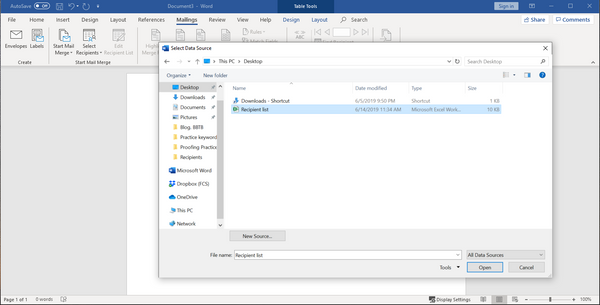
Step 4: Under the "Mailings" tab, click "Select Recipients" and "Use an Existing List." Select the excel list and hit "Ok."
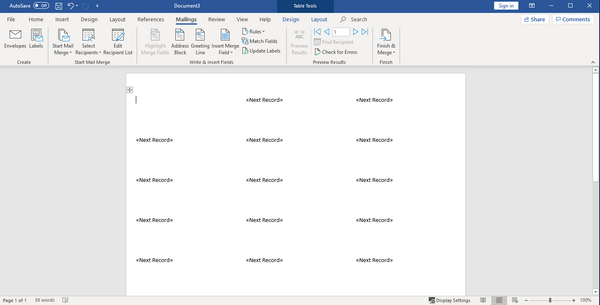
Step 5: With the first record selected, click the option on the tool bar “Insert Merge Field.” You will want to individually select each option on the dropdown bar. As you select them, they will appear on your document. Add line breaks wherever is necessary.
Step 6: Next, select “Update Labels.” This will duplicate your text across your page.

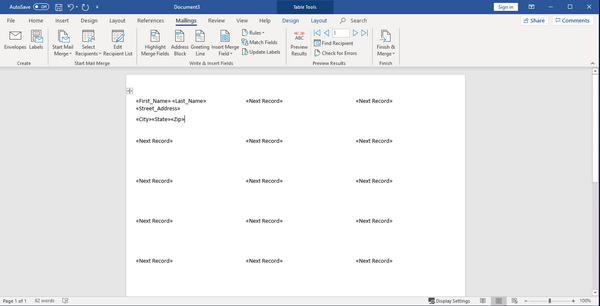
Step 7: Click “Preview Results” in the tool bar. This will add all the names and addresses from your Excel spreadsheet to your document.
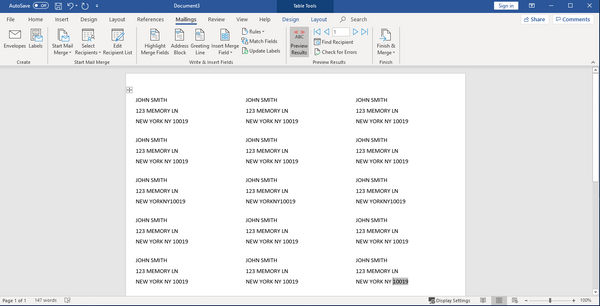
Step 8: If this preview looks okay, go ahead and select “Finish and Merge” and “Edit Individual Documents.” Once you have done this, all your addresses should pop up on this new document and you’re set to print your labels.
You can also try envelope addressing services. There are printing or copy shops which print addresses directly on your envelopes. There are also online options for printing addresses. This will mainly be helpful if you plan to send a large quantity of mail. Choosing a local print shop is a great option, but online services save time. You don’t have to make phones calls or pick up orders; instead, just place an order online. Here are some services we recommend:
Some of these services also provide return address labeling. You have the option of getting your return address printed directly on the envelope, or getting labels made separately.
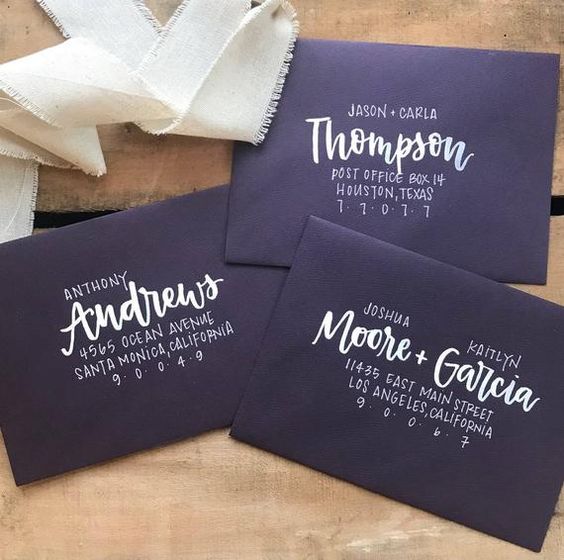
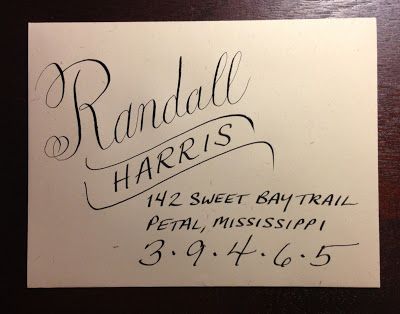
If you want to go the extra mile, try spicing up your envelope just a little bit with handwritten addressing services. These not only make your envelope more beautiful but add a personal touch. Check out these sites to for hand addressed envelopes:
Creative Ways To Address Envelopes
Now you know how to head an envelope properly, keep in mind the postal service will still accept and deliver mail that doesn’t follow these rules perfectly. It’s good to think of these rules more like guidelines, so feel free to try some more creative ways of addressing an envelope.
Here are some fun ways to address an envelope.
- Refine your handwriting. Addressing envelopes in calligraphy adds an elegant touch to your correspondence. However, calligraphy is not the only option you have for changing your writing style. Google has a service with hundreds of fonts listed and you can mimic the font of your choice to add a personal touch, or there are other smaller independent sites that offer more professional fonts.
Also, don’t forget to use a stencil for your calligraphy envelope addressing template. We have a few resources to help you keep your writing clean and orderly:
- A6 envelope stencil. This is a free printable template just for addressing envelopes. However, it’s designed specifically for A6 sized envelopes. These envelopes are often used for invitations.
- Downloadable addressing template. Etsy offers a really great envelope addressing template. You can purchase this downloadable template to your computer. All you’ve got to do is insert every address into each line, and you can have beautiful text printed right on your envelope.
Anytime you change up your handwriting, it will be a challenge to keep your writing straight and even. Be sure to use an envelope addressing stencilso your fun font won’t leave you with a sloppy envelope.
- Write the address differently. Instead of the traditional three lines aligned on the left-hand side, try something different. Maybe write out the address lines centered on the envelope, or align the address along the right, or even address the envelope in a circular format. For unique, step-by-step addressing processes, check out these sites:
7 Ways to Address an Envelope
5 Unique Ways to Address an Envelope
How to Hand-Letter an Envelope
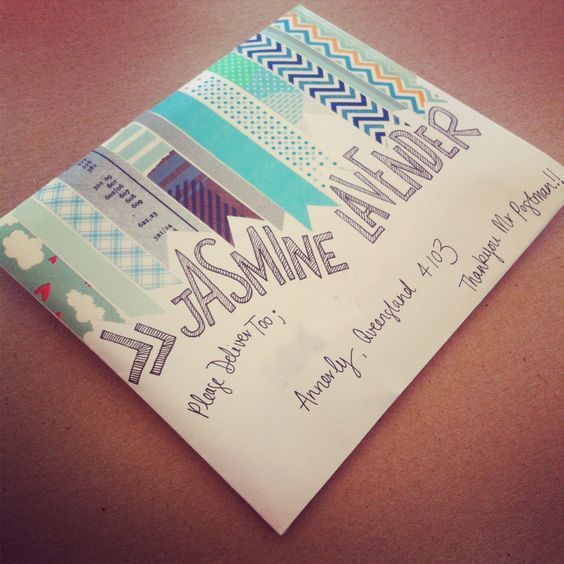
- Decorate your envelope. There are so many options for decorating mail. You can draw on your envelope, washi tape it, or even watercolor your envelope. Just try anything (as long as the address is legible!) and see if it works.
 For more informative articles about office supplies, subscribe to our email newsletter!
Never fear, you won't begin receiving daily sales emails that belong in a spam folder. Instead, we promise a fun weekly roundup of our latest blog posts and great finds from across the web. And if you lose interest, it's always easy to unsubscribe with a single click.
Whether you’re addressing an envelope to a business or a friend, we hope this post has been informative and helpful. Please reach out and let us know if you have any questions. Connect with us on social media, on Twitter, Facebook, or Instagram. We’d love to hear from you!

2 comments
Lauren
Hello Steve, thank you for your question! It’s not a requirement to label an envelope containing documents, so it would be up to you on whether or not you’d like to include a notation on you envelope. A notation of ‘Documents Enclosed’ below your return address would be fine.
Steve martin
IF I MAIL DOCUMENTS SHOULD I RIGHT SOMETHING ON THE ENVELOPE ?